Final Project: Squid Self-Defense Necklace
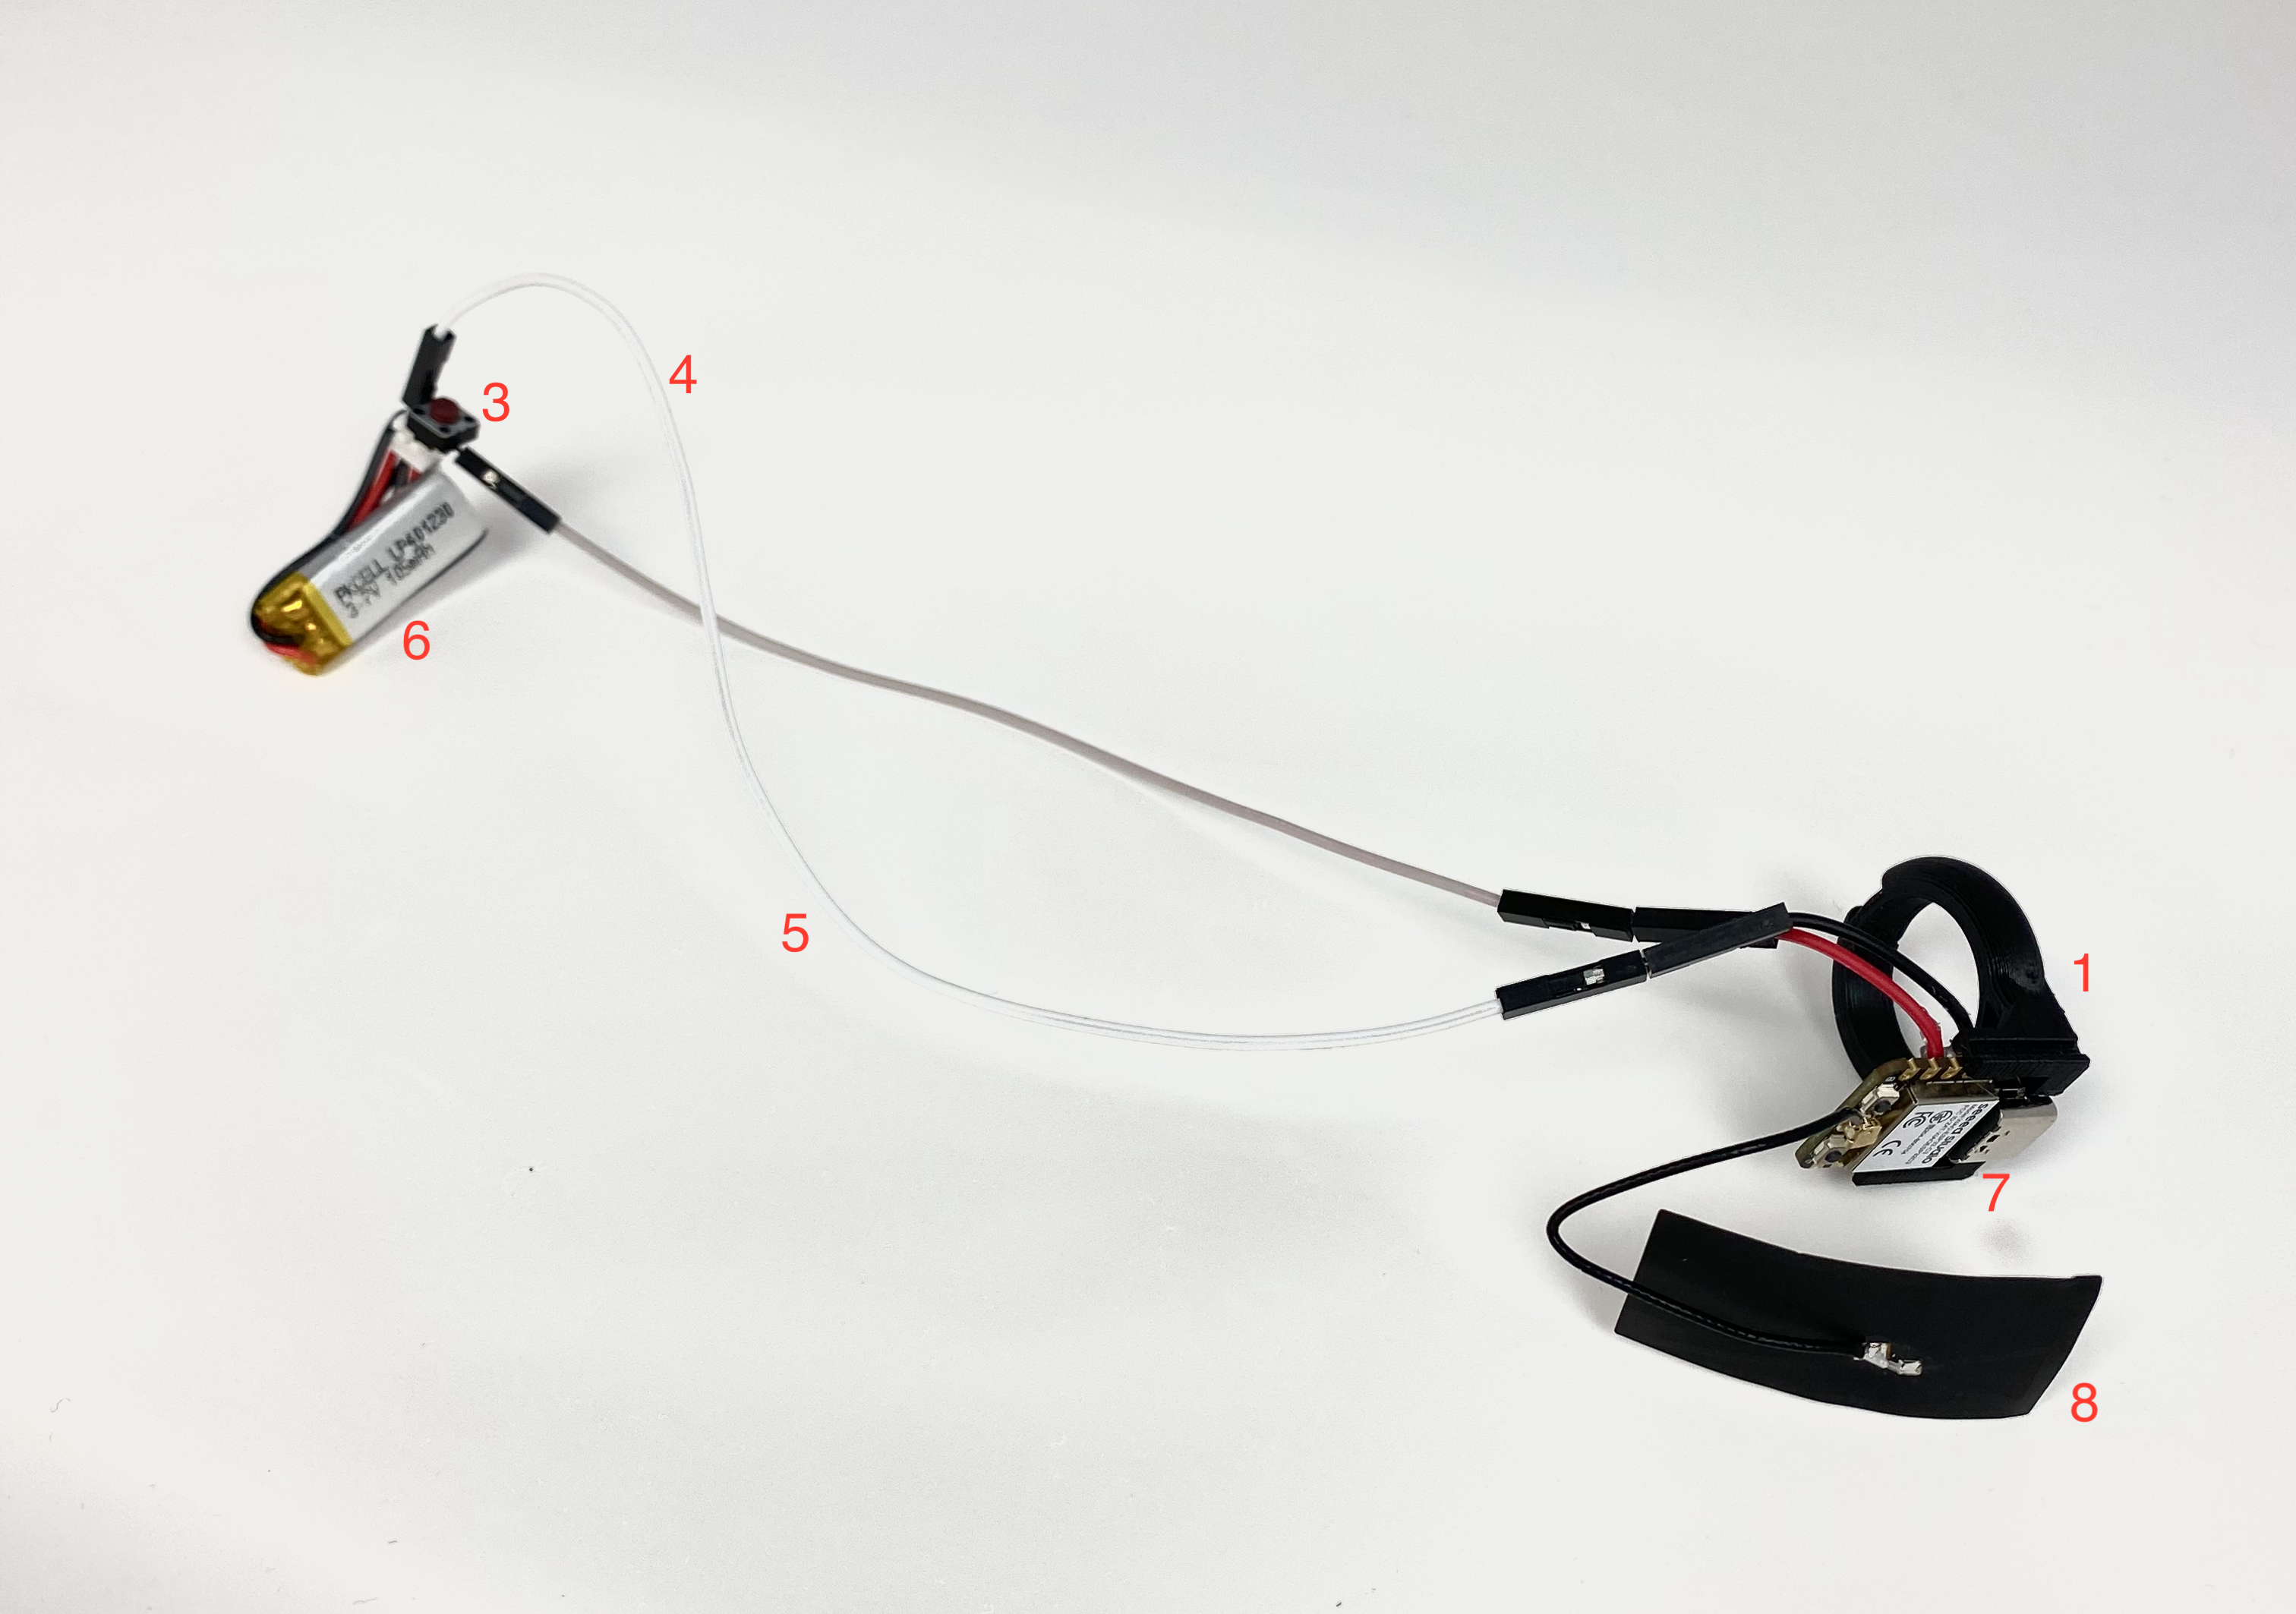
THE INSPIRATION This self-defense necklace and ring combo was created to help people get away from an attacker in a tight space, regardless of whether or not they are restrained. It was inspired by squids, which use ink as a defense mechanism to get away from predators. In this prototype, I am using water for the sake of demonstration. If this necklace were to be put into use, the liquid inside would be smelly ink for two reasons: 1. The ink will mark the attacker and stain their skin for a few days to help law enforcement identify them and 2. the smell would act as a deterrant. HOW IT WORKS: BASICS There are two parts to this project: the ring and the necklace. When you press a button on the ring, it acts like a switch and closes the circuit between a battery and a microcontroller. The microcontroller then sends out a signal announcing its presence. The necklace is powered on by a battery the whole time. The microcontroller on the necklace is programmed to scan the room for all bluetooth devices, and when it finds a device named "ana_beetle," it turns on a pump motor which releases the ink. THE PARTS Materials List Ring: - ring (3D printed) STL file: Download Ring STL file - ring cover (3D printed) STL file: Download Ring Cover STL file - button - XIAO ESP32C3 microcontroller from Seeed link here - 105 mAh 3.7V lithium ion battery - antenna booster - 4x wires (circuit diagram can be found further down) Necklace: - Pendant (3D printed) STL file: Download Pendant STL file - Pendant cover (3D printed) STL file: Download Pendant Cover STL file - Necklace chain (commercial) - XIAO ESP32C3 microcontroller from Seeed link here - L9110 H Bridge Power Driver - 350 mAh 3.7V lithium ion battery - Mini Pump Motor link here - Pump tubes x2 - Water container & lid (3D printed) STL file: Download Ink Sac STL file - Spray nozzle (taken from commercial fine mist container) - 6x wires (circuit diagram can be found further down) The ring is composed of 8 parts. The ring itself (1) is 3D printed, as is the ring cover (2) (not pictured). There is a button (3) inserted in the ring conneted to two wires (4,5) that connect to the Lithium Ion 3.7V battery (6) and the XIAO ESP32-C3 microcontroller (7). The microcontroller has an addition (8) that boosts its outputting bluetooth signal.
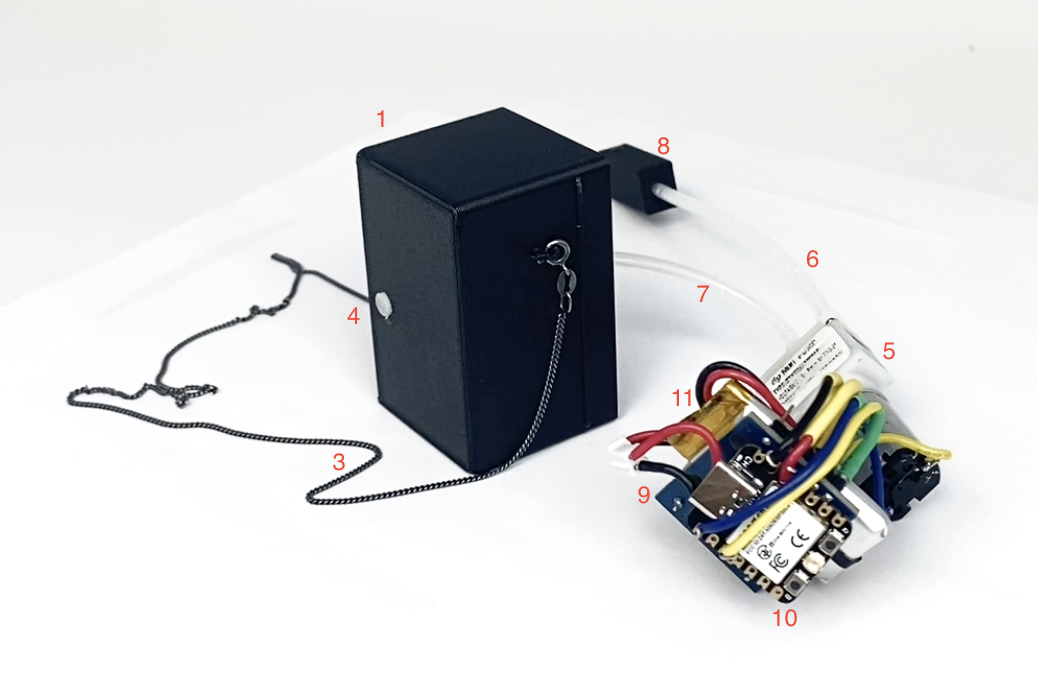
The necklace is composed of 11 parts, not counting wires. The case (1) is 3D printed, as is the case cover (2) (not pictured). The chain (3) is reused from an old necklace. The nozzle (4) was taken from a commercial cosmetic spray bottle. The pump (5) and its tubes (6,7) connect to a 3D printed box (8) which contains the water. The motor is connected to an L9110 controller (9), which is connected to our XIAO ESP32-CS microcontroller (10), which is wired into a 3.7V Lithium Ion Battery (11).
(Additional perspectives of each part can be seen in the video above.)
CIRCUIT DIAGRAMS
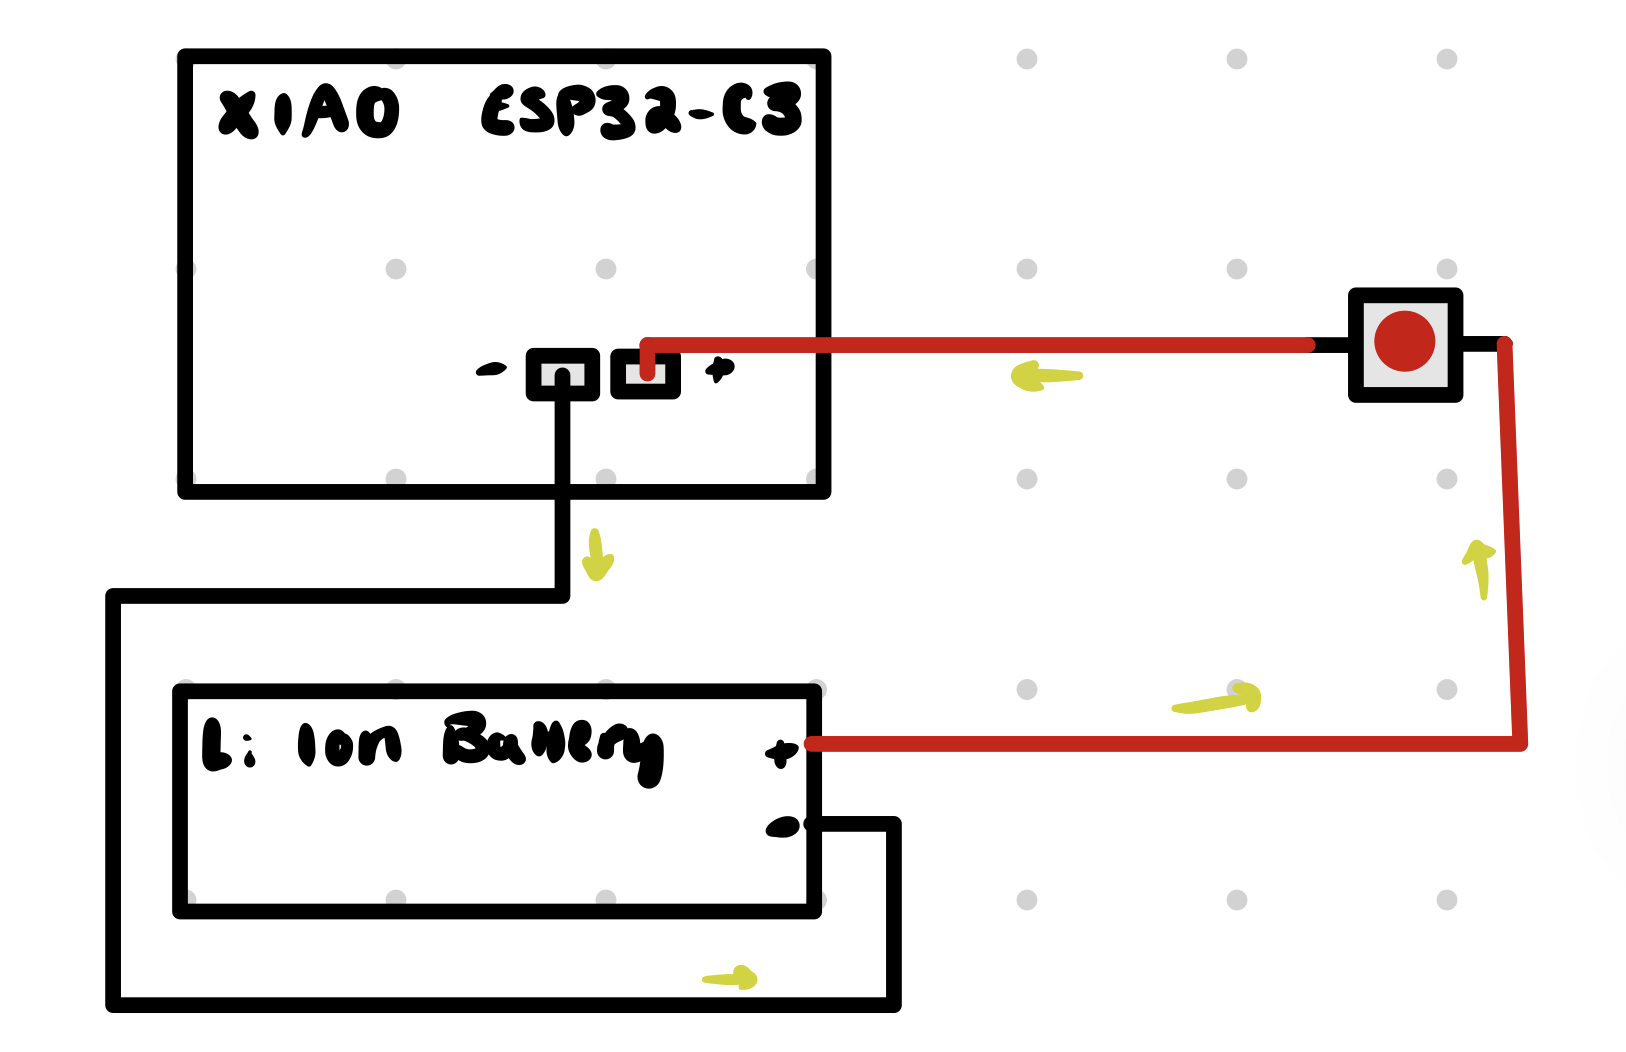
Ring circuit:
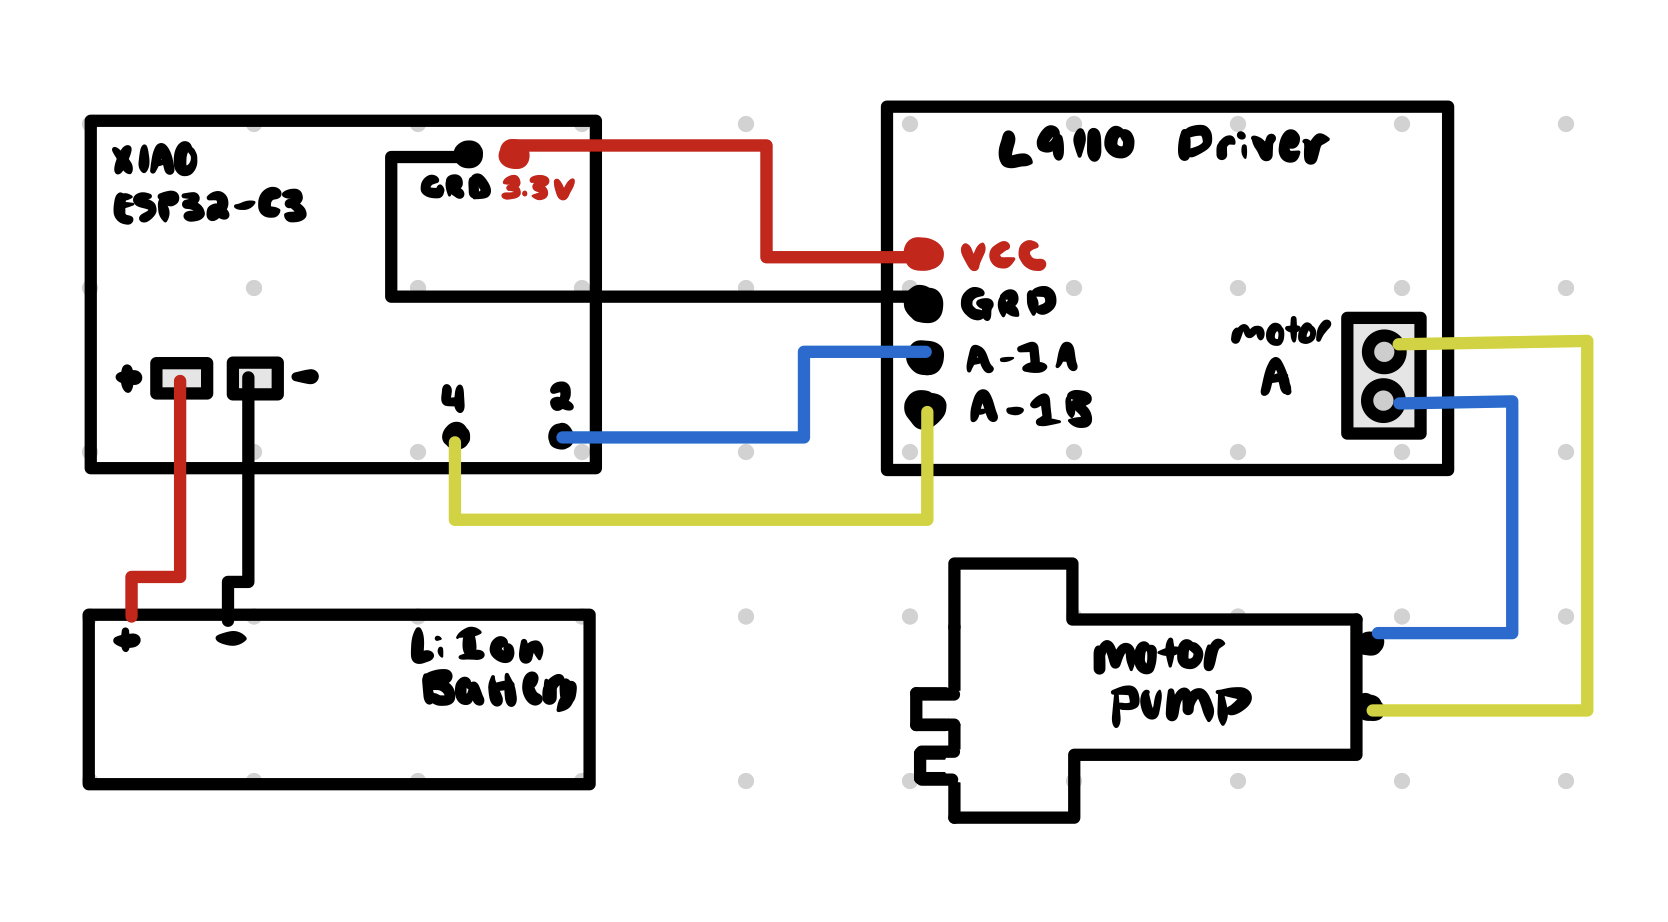
Necklace circuit:
THE CODE I used the server/scanner tutorial from RandomNerdTutorials. to code my EP32-C3 microcontrollers. There were two sets of code. For the server (the ring code), my code is nearly identical to the sample code for a BLE server given by Arduino. The only thing I changed was the name of my bluetooth device.
/*
    Based on Neil Kolban example for IDF: https://github.com/nkolban/esp32-snippets/blob/master/cpp_utils/tests/BLE%20Tests/SampleServer.cpp
    Ported to Arduino ESP32 by Evandro Copercini
    updates by chegewara
*/

#include < BLEDevice.h> //remove space after "<"
#include < BLEUtils.h> //remove space after "<"
#include < BLEServer.h> //remove space after "<"

// See the following for generating UUIDs:
// https://www.uuidgenerator.net/

#define SERVICE_UUID        "4fafc201-1fb5-459e-8fcc-c5c9c331914b"
#define CHARACTERISTIC_UUID "beb5483e-36e1-4688-b7f5-ea07361b26a8"

void setup() {
  Serial.begin(115200);
  Serial.println("Starting BLE work!");

  BLEDevice::init("ana_beetle");
  BLEServer *pServer = BLEDevice::createServer();
  BLEService *pService = pServer->createService(SERVICE_UUID);
  BLECharacteristic *pCharacteristic = pService->createCharacteristic(
                                         CHARACTERISTIC_UUID,
                                         BLECharacteristic::PROPERTY_READ |
                                         BLECharacteristic::PROPERTY_WRITE
                                       );

  pCharacteristic->setValue("Hello World says Neil");
  pService->start();
  // BLEAdvertising *pAdvertising = pServer->getAdvertising();  // this still is working for backward compatibility
  BLEAdvertising *pAdvertising = BLEDevice::getAdvertising();
  pAdvertising->addServiceUUID(SERVICE_UUID);
  pAdvertising->setScanResponse(true);
  pAdvertising->setMinPreferred(0x06);  // functions that help with iPhone connections issue
  pAdvertising->setMinPreferred(0x12);
  BLEDevice::startAdvertising();
  Serial.println("Characteristic defined! Now you can read it in your phone!");
}

void loop() {
  delay(2000);
}
However, I seem to have lost or overwritten the code for the microcontroller in the necklace. Essentially, I used the Aruino example code for an ESP32 BLE scanner, which I've included below. However, there was an additional few lines of code essential to making the necklace work, which PK (one of our TFs) helped me write. While coding and syntax isn't my strong suit, I remember that the additional code used the bool feature, a for loop, and an if/else statement. The basic scanning code allows the microcontroller to find and write every bluetooth device within range into its serial monitor. The bool and the for loop then sequenced each device in the serial monitor and looked at its "Name". Then, the if statement said that if we found the name "ana_beetle" (the name of our ring), the necklace would turn on the motor. Otherwise, if in the 5 second scan the microchip did not find "ana_beetle," then it would turn the motor off.
        /* Based on Neil Kolban example for IDF: https://github.com/nkolban/esp32-snippets/blob/master/cpp_utils/tests/BLE%20Tests/SampleScan.cpp
        Ported to Arduino ESP32 by Evandro Copercini */
        #include < BLEDevice.h> //remove space after "<"
        #include < BLEUtils.h> //remove space after "<"
        #include < BLEScan.h> //remove space after "<"
        #include < BLEAdvertisedDevice.h> //remove space after "<"

int scanTime = 5; //In seconds
BLEScan* pBLEScan;

class MyAdvertisedDeviceCallbacks: public BLEAdvertisedDeviceCallbacks {
    void onResult(BLEAdvertisedDevice advertisedDevice) {
      Serial.printf("Advertised Device: %s \n", advertisedDevice.toString().c_str());
    }
};

void setup() {
  Serial.begin(115200);
  Serial.println("Scanning...");

  BLEDevice::init("");
  pBLEScan = BLEDevice::getScan(); //create new scan
  pBLEScan->setAdvertisedDeviceCallbacks(new MyAdvertisedDeviceCallbacks());
  pBLEScan->setActiveScan(true); //active scan uses more power, but get results faster
  pBLEScan->setInterval(100);
  pBLEScan->setWindow(99);  // less or equal setInterval value
}

void loop() {
  BLEScanResults foundDevices = pBLEScan->start(scanTime, false);
  Serial.print("Devices found: ");
  Serial.println(foundDevices.getCount());
  Serial.println("Scan done!");
  pBLEScan->clearResults();   // delete results fromBLEScan buffer to release memory
  delay(2000);
}
THE PROCESS
(Narrative) When I first came up with this idea, I broke it down to the basic components. When I press a button on the ring, I wanted it to connect to a microcontroller in the ring which would send a BLE (bluetooth low energy) signal to the necklace. Then, a microcontroller on the necklace receives the BLE signal, it would turn on some mechanism which would spray out of the pendant. Quickly, I realized I could use a mini pump motor instead of building a mechanical mechanism for the spray, which helped simplify my design.
I started with the ring. I wanted the design to be 1) functional 2) as small as possible 3) aesthetically pleasing. I also wanted to make sure that the design was accessible, meaning that if one part broke I could easily replace it and take the entire ring apart without throwing it away. (This was a priority to me because, in my research, I saw that Apple AirPods were filled with glue, which made it impossible to take apart and fix and creates more waste). I drew multiple sketches of what the ring might look like in order to save time while designing in Autodesk Fusion 360.
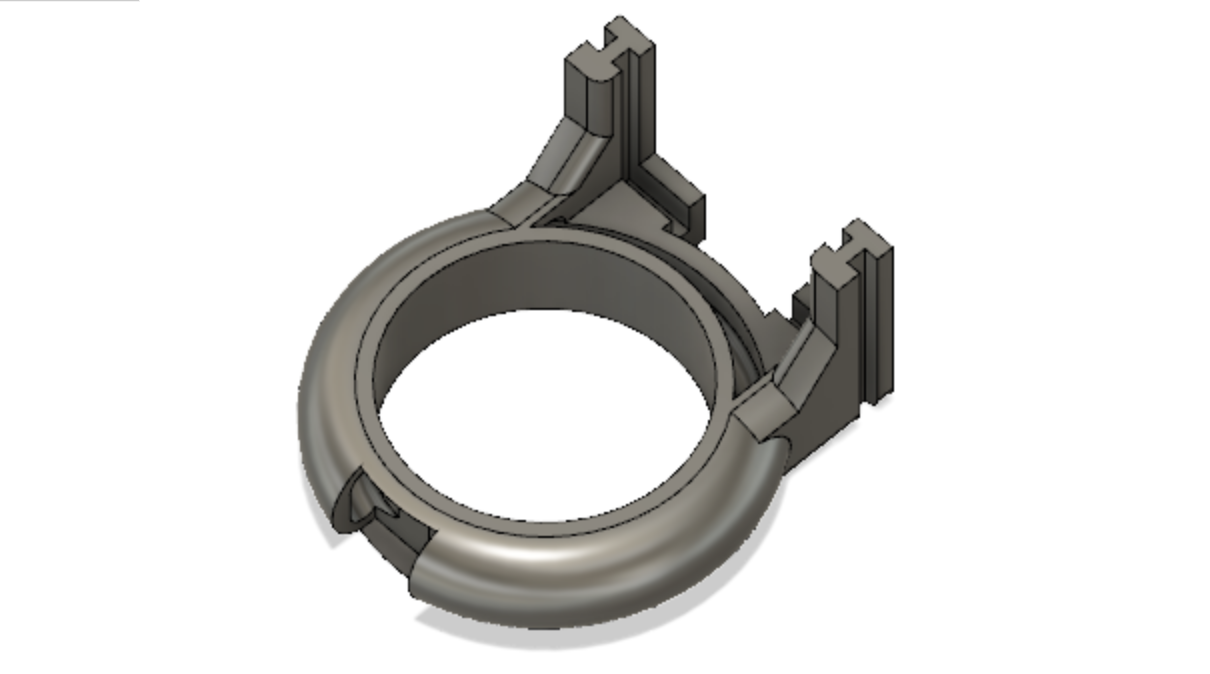
I ended up designing the below ring. The ring itself is hollow, so that the wires from the button can go through without being visible. The microcontroller slides firmly into two slots, and the USB-C port is accessible. When I was desiging the ring, I wasn't sure what my power source would be, so I decided to leave the port accessible to give myself more flexibility down the line. I also included slots on the outside that a ring cover could slide down onto.
Satisfied that I had a physical ring, I began to design the circuit. At first, I was only working with the basic "server" code from arduino (the code is included above under "THE CODE" section). At first, I wanted to integrate the button to send a signal via bluetooth, which would require altering the code. However, I then realized I could use the button as a switch that turns the microcontroller on or off by connecting it through the battery. Not only does this avoid additional code, but it also saves battery power since the circuit is not on 24/7.
Now that I knew the ring would be functional, I shifted focus to the necklace before assembling. I wanted to make sure it worked, and that I had all of the parts necessary, before designing the pendant. I started by making sure that the motor would turn on. I first tried to turn the motor on using the same code I would use for an LED, but realized it wouldn't turn on. I checked another motor to confirm that it was the code and not the motor that wasn't working. Then, I copied old code from week 5 using an L9110 motor driver for the motor. The pump worked with this additional motor driver, so I was satisfied and moved on to integrating the motor code with the arduino example "BLE scan" code (included above).
Since the button on the ring only turned on the ring microcontroller but did not send a signal, I needed the necklace microcontroller to scan for all bluetooth devices and turn on the motor if it saw the ring's name. (Ta-da! There is no bluetooth connection being made here. I noticed my classmates had a lot of glitches when they made an actual connected, so I wanted to be as simple as possible). PK helped me write code (explained above) that would do this. After some assembly of a relatively simple circuit, I got the motor to turn on when I pressed the ring's button. Now it was time to assemble and build!
I quickly assembled the ring by wrapping wires around the button and sliding them through the ring. I clipped them to the shortest possible length and connected one to the battery, and the other to the microcontroller. I then connect the other wire on the microcontroller to the other port on the battery. The ring was assembled, so I quickly measured it and then made a ring cover to slide on. Luckily, the ring cover came out right on the first try. The ring was done! Below is an image of the ring cover:
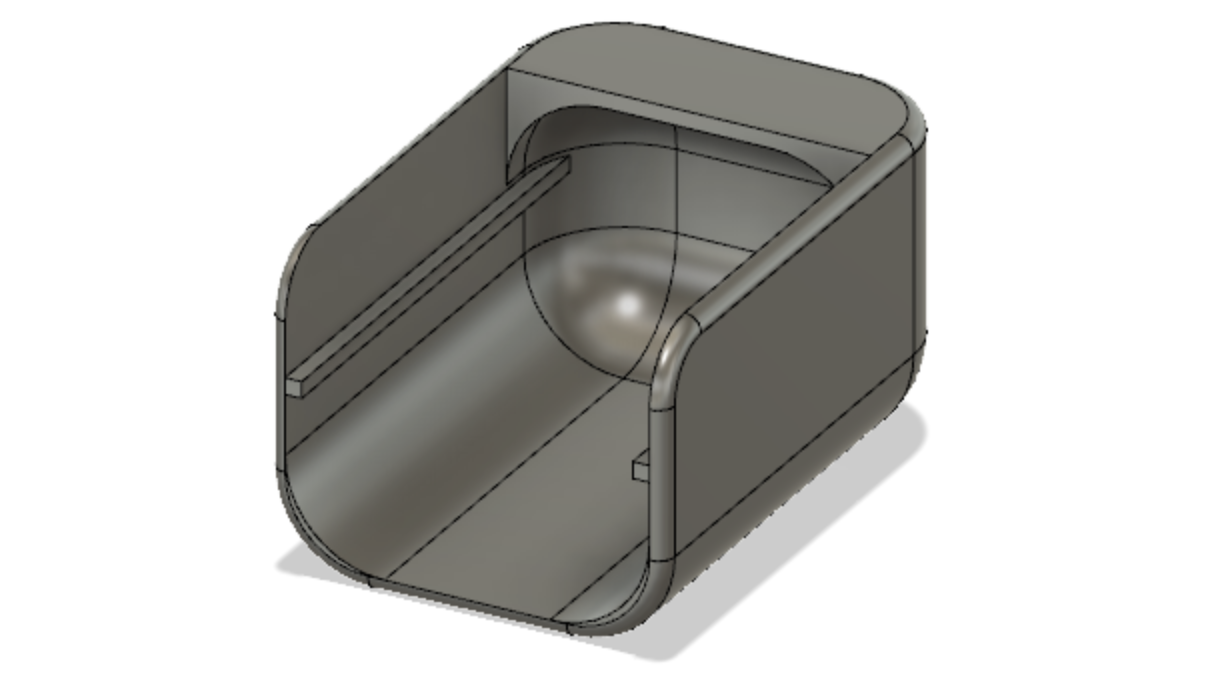
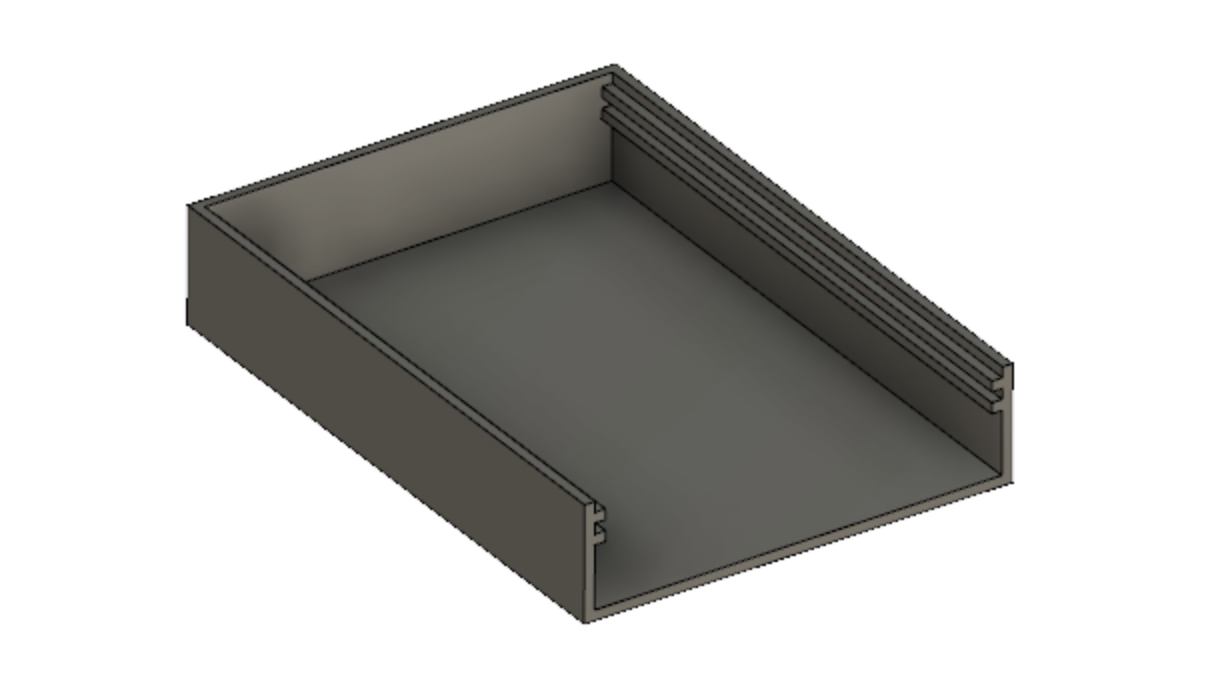
I then assembled the necklace. I clipped the wires as short as possible, and wrapped the microcontroller, L9110 motor driver, and 350 mAh lithium ion battery as tightly I could. I measured a gap between the motor and the bundled microcontrollers, then 3D printed what I nicknamed the "ink sac". There is a hole in the top for one of the tubes from the motor pump, and a lid on the bottom to refill the sac. Below is the "ink sac":
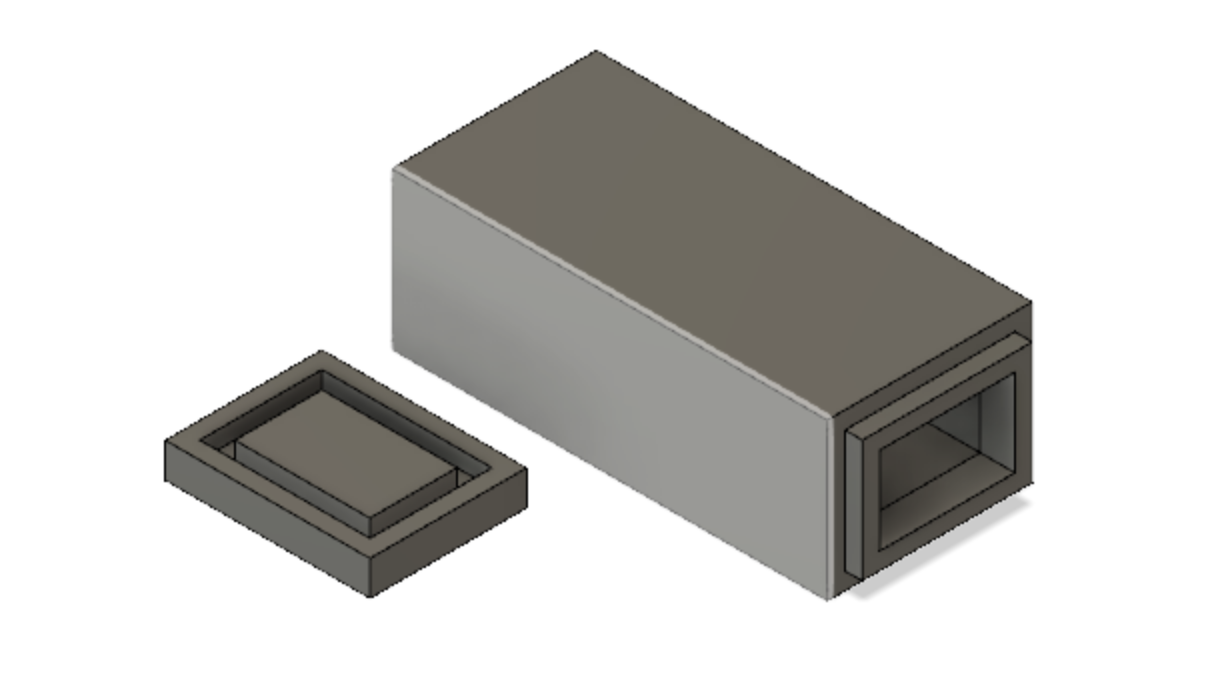
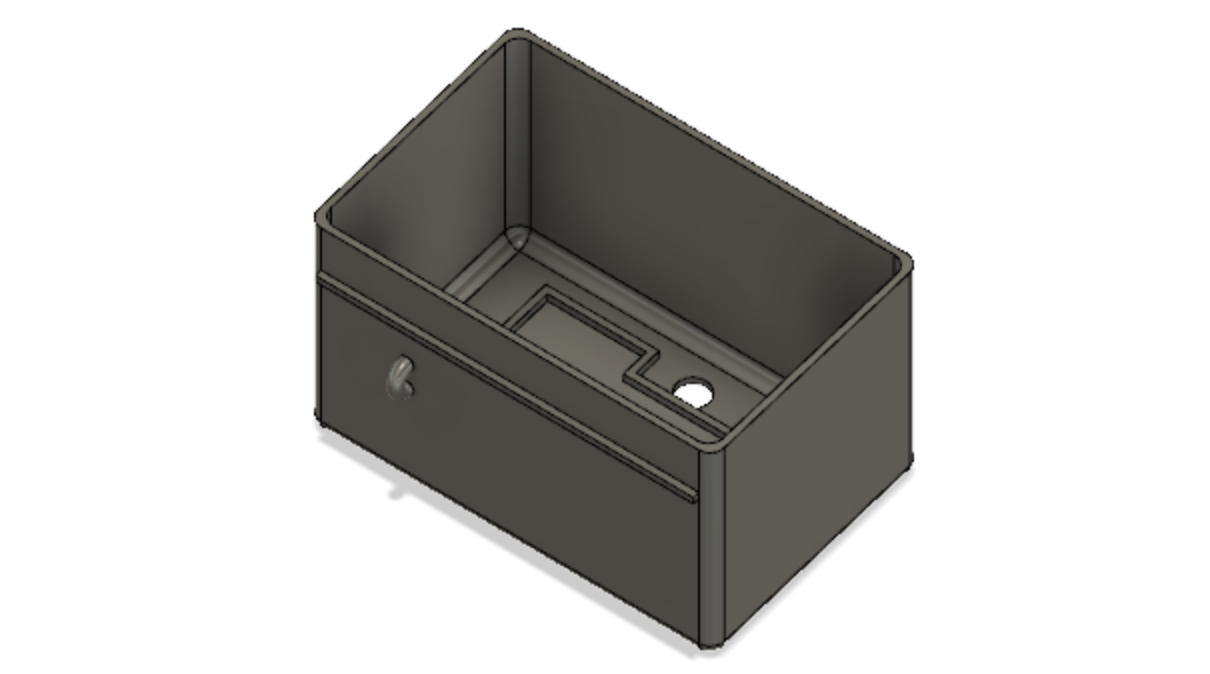
Time was tight, so I measured the largest width, height, and length of the bundle and 3d printed a box to put it all in. The design wasn't particularly appealing, but it matched the ring, and everything fit snugly without sliding around. The box design is below, followed by the lid, which slides on with the same mechanism as the ring cover.
NEXT TIME There are a few things I'd have done differently if I had another chance to make this project. Mostly, I would focus on the necklace. I would make it more aesthetically pleasing than a simple box. I would also make the "ink sac" refillable from the outside, so I didn't have to unpack the pendant every time I wanted to do a demonstration. For the ink, if I mixed pen-ink with durian juice (a smelly fruit), it would give me the smelly ink that I wanted. I'm happy with how the ring turned out, so with the materials and knowledge I learned from PS70, I don't think I would change that design. With other resources, I would have of course made it smaller, because at the moment it's about as discreet as an ankle monitor but for your hand. I'd like to look at the Oura rings as inspiration for how to pack bluetooth technology so small.